Get started with local Docker Sandboxes
This walkthrough uses local sandboxes. For cloud credentials and a first cloud session, see Get started with cloud sandboxes.
Docker Sandboxes run AI coding agents in isolated microVM sandboxes. Each sandbox gets its own Docker daemon, filesystem, and network — the agent can build containers, install packages, and modify files without accessing host resources beyond those you share.
This page walks through your first session: run an agent in a sandbox, see how the sandbox isolates it, control what it can reach on the network, and clean up.
Prerequisites
- Install the
sbxCLI and sign in to Docker - Configure an authentication method for the agent you want to use. Most agents require an API key for their model provider. See the agent pages for provider-specific instructions.
Authenticate your agent
For Claude Code with a Claude subscription (Max, Team, or Enterprise), no
upfront setup is needed — use the /login command inside the sandbox to sign
in with OAuth. The session token stays on your host and is never stored inside
the sandbox.
If you prefer to authenticate with an API key, see
Credentials for how to store one with
sbx secret set.
To give the agent access to GitHub for creating pull requests or interacting with repositories:
$ sbx secret set github --command 'gh auth token'
Run your first sandbox
Pick a project directory and launch an agent with
sbx run:
$ cd ~/my-project
$ sbx run --name my-sandbox claude
The first time you run a sandbox, the CLI prompts you to choose a default network preset:
Initialize the global network policy for your sandboxes:

  Applies to all sandboxes, current and future — change it later with
  "sbx policy allow/deny/rm". Kits, including built-in agent kits, may
  also add per-sandbox rules.

     1. Open         — All network traffic allowed, no restrictions.
  ❯  2. Balanced     — Default deny, with common dev sites allowed.
     3. Locked Down  — All network traffic blocked unless you allow it.

  Use ↑/↓ or 1–3 to navigate, Enter to confirm, Esc to cancel.
Balanced is a good starting point — it permits traffic to common development services while blocking everything else. You can adjust individual rules later. See Local policy for a full description of each option.
Replace claude with the agent you want to use — see Agents for the
full list.
The first run takes a little longer while the agent image is pulled. Subsequent runs reuse the cached image and start in seconds.
This attaches you to the agent running inside the sandbox. Give it a real task — ask it to add a feature, install a dependency, or build and run your project. The agent has a full Linux environment with its own Docker daemon, so it can install packages, build images, and start containers on its own while it works.
See what the agent can touch
From another terminal, list your sandboxes:
$ sbx ls
SANDBOX      AGENT    STATUS      PORTS   WORKSPACE      CREATED
my-sandbox   claude   ● running           ~/my-project   2m
Each row shows a sandbox's name, agent, status, published ports, workspace, and age. The workspace is the host directory shared into the sandbox and the one part of your machine the agent can see.
When you run sbx run from a project directory without passing a workspace
path, the current directory is mounted read-write. The agent and your host see
the same files. Edits the agent makes to your project appear in your working
tree as it writes them, and you review them as an ordinary Git diff before
committing.
Everything else runs inside the microVM, isolated from your host:
- The agent has its own filesystem, Docker daemon, and network.
- Packages it installs, images it pulls, and containers it starts stay inside the sandbox. Your host system is untouched, and removing the sandbox discards them.
If you'd rather the agent not touch your working tree at all — for example, when running several agents on one repository — use clone mode, which gives it a private clone instead.
Control what the agent can reach
Isolation isn't only about the filesystem. You also control what the sandbox can reach on the network. You chose a default policy before the sandbox started, and you can inspect or adjust it at any time.
Check which rules are in effect:
$ sbx policy ls
To allow a specific host:
$ sbx policy allow network registry.npmjs.org
With Locked Down, even your model provider API is blocked unless you explicitly allow it. With Balanced, common development services are permitted by default. See local policy for the full rule set and how to customize it.
Clean up
Sandboxes persist after the agent exits, so you can stop one and pick up where you left off later:
$ sbx stop my-sandbox
Installed packages, Docker images, and configuration changes are preserved across restarts. When you're done with a sandbox, remove it to reclaim disk space:
$ sbx rm my-sandbox
Removing a sandbox deletes everything inside it — installed packages, Docker images, and the in-sandbox Git clone if you used clone mode. Files in your host working tree are unaffected.
What's next
You've run an agent, seen how the sandbox isolates it, and controlled its network access. A few directions from here.
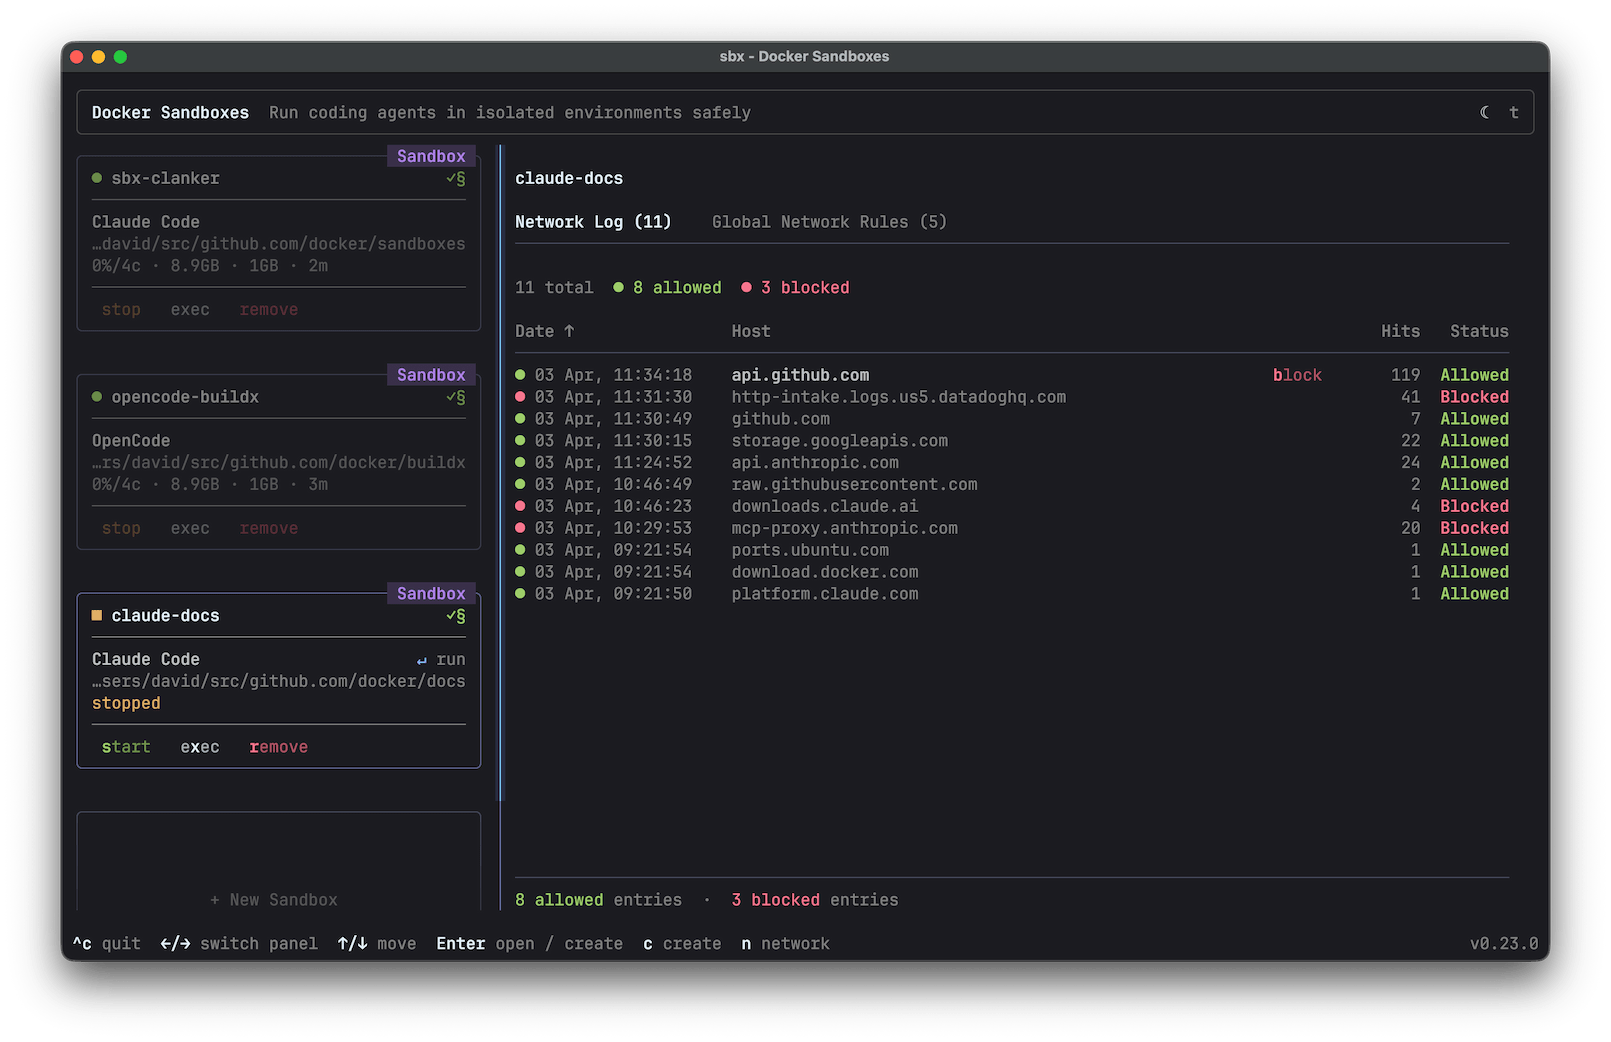
Run sbx with no arguments to open the interactive dashboard: a live view of
every sandbox where you can attach to agents, open shells, and manage network
rules from one place.
Then explore:
- Usage guide — basic commands, reconnecting, workspaces, and port publishing.
- Workflow patterns — Git strategies, local services, CI, and authenticated tools.
- Sandbox environment files — declare and share
repeatable local sandbox configurations with
sbxenv.yaml. - Customize with kits — package an agent, its tools, and its network rules into a reusable definition you launch with a single flag.
- Agents — the full list of supported agents and how to configure each one.
- Governance — centrally manage network, filesystem, and MCP policies across a team.