Persist the DB
In case you didn't notice, your todo list is empty every single time you launch the container. Why is this? In this part, you'll dive into how the container is working.
The container's filesystem
When a container runs, it uses the various layers from an image for its filesystem. Each container also gets its own "scratch space" to create/update/remove files. Any changes won't be seen in another container, even if they're using the same image.
See this in practice
To see this in action, you're going to start two containers. In one container, you'll create a file. In the other container, you'll check whether that same file exists.
Start an Alpine container and create a new file in it.
$ docker run --rm alpine touch greeting.txtTipAny commands you specify after the image name (in this case,
alpine) are executed inside the container. In this case, the commandtouch greeting.txtputs a file namedgreeting.txton the container's filesystem.Run a new Alpine container and use the
statcommand to check whether the file exists.$ docker run --rm alpine stat greeting.txtYou should see output similar to the following that indicates the file does not exist in the new container.
stat: can't stat 'greeting.txt': No such file or directory
The greeting.txt file created by the first container did not exist in the
second container. That is because the writeable "top layer" of each container
is isolated. Even though both containers shared the same underlying layers that
make up the base image, the writable layer is unique to each container.
Container volumes
With the previous experiment, you saw that each container starts from the image definition each time it starts. While containers can create, update, and delete files, those changes are lost when you remove the container and Docker isolates all changes to that container. With volumes, you can change all of this.
Volumes provide the ability to connect specific filesystem paths of the container back to the host machine. If you mount a directory in the container, changes in that directory are also seen on the host machine. If you mount that same directory across container restarts, you'd see the same files.
There are two main types of volumes. You'll eventually use both, but you'll start with volume mounts.
Persist the todo data
By default, the todo app stores its data in a SQLite database at
/etc/todos/todo.db in the container's filesystem. If you're not familiar with SQLite, no worries! It's simply a relational database that stores all the data in a single file. While this isn't the best for large-scale applications,
it works for small demos. You'll learn how to switch this to a different database engine later.
With the database being a single file, if you can persist that file on the host and make it available to the
next container, it should be able to pick up where the last one left off. By creating a volume and attaching
(often called "mounting") it to the directory where you stored the data, you can persist the data. As your container
writes to the todo.db file, it will persist the data to the host in the volume.
As mentioned, you're going to use a volume mount. Think of a volume mount as an opaque bucket of data. Docker fully manages the volume, including the storage location on disk. You only need to remember the name of the volume.
Create a volume and start the container
You can create the volume and start the container using the CLI or Docker Desktop's graphical interface.
Create a volume by using the
docker volume createcommand.$ docker volume create todo-dbStop and remove the todo app container once again with
docker rm -f <id>, as it is still running without using the persistent volume.Start the todo app container, but add the
--mountoption to specify a volume mount. Use the volume namedtodo-db, and mount it to/etc/todosin the container, which captures all files created at the path.$ docker run -dp 127.0.0.1:3000:3000 --mount type=volume,src=todo-db,target=/etc/todos getting-startedNoteIf you're using Git Bash, you must use different syntax for this command.
$ docker run -dp 127.0.0.1:3000:3000 --mount type=volume,src=todo-db,target=//etc/todos getting-startedFor more details about Git Bash's syntax differences, see Working with Git Bash.
To create a volume:
- Select Volumes in Docker Desktop.
- In Volumes, select Create.
- Specify
todo-dbas the volume name, and then select Create.
To stop and remove the app container:
- Select Containers in Docker Desktop.
- Select Delete in the Actions column for the container.
To start the todo app container with the volume mounted:
Select the search box at the top of Docker Desktop.
In the search window, select the Images tab.
In the search box, specify the image name,
getting-started.TipUse the search filter to filter images and only show Local images.
Select your image and then select Run.
Select Optional settings.
In Host port, specify the port, for example,
3000.In Host path, specify the name of the volume,
todo-db.In Container path, specify
/etc/todos.Select Run.
Verify that the data persists
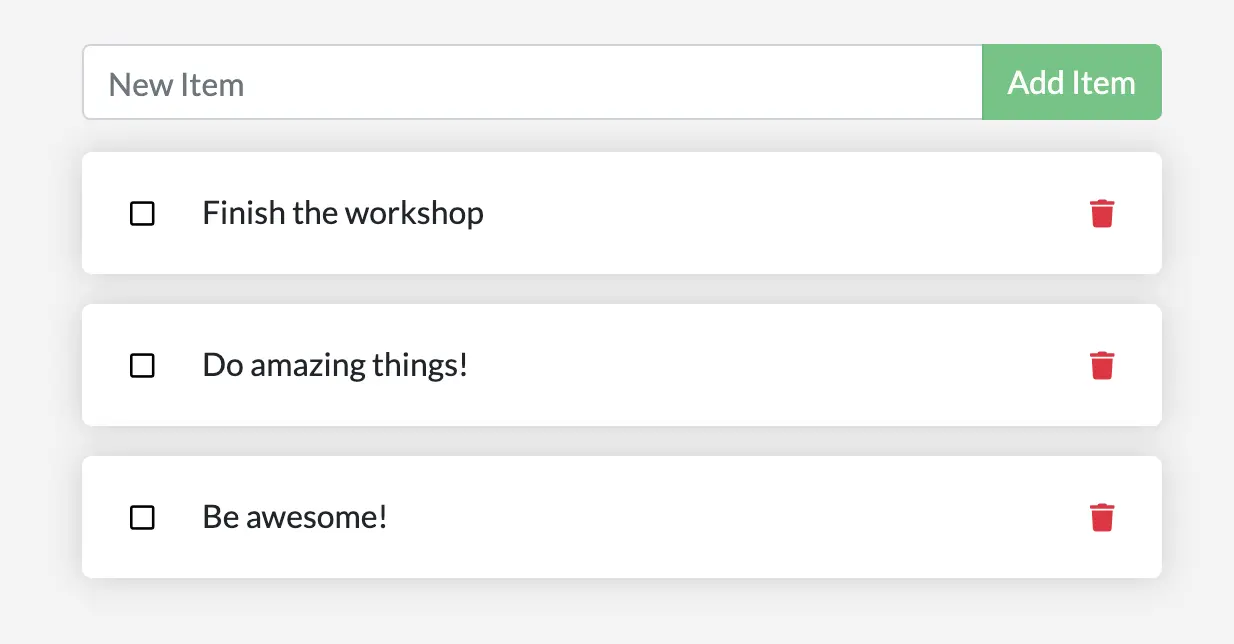
Once the container starts up, open the app and add a few items to your todo list.
Stop and remove the container for the todo app. Use Docker Desktop or
docker psto get the ID and thendocker rm -f <id>to remove it.Start a new container using the previous steps.
Open the app. You should see your items still in your list.
Go ahead and remove the container when you're done checking out your list.
You've now learned how to persist data.
Dive into the volume
A lot of people frequently ask "Where is Docker storing my data when I use a volume?" If you want to know,
you can use the docker volume inspect command.
$ docker volume inspect todo-db
You should see output like the following:
[
    {
        "CreatedAt": "2019-09-26T02:18:36Z",
        "Driver": "local",
        "Labels": {},
        "Mountpoint": "/var/lib/docker/volumes/todo-db/_data",
        "Name": "todo-db",
        "Options": {},
        "Scope": "local"
    }
]
The Mountpoint is the actual location of the data on the disk. Note that on most machines, you will
need to have root access to access this directory from the host.
Summary
In this section, you learned how to persist container data.
Related information:
Next steps
Next, you'll learn how you can develop your app more efficiently using bind mounts.
Use bind mounts