Build and run agentic AI applications with Docker
TipThis guide uses the familiar Docker Compose workflow to orchestrate agentic AI applications. For a smoother development experience, check out Docker Agent, a purpose-built agent runtime that simplifies running and managing AI agents.
Introduction
Agentic applications are transforming how software gets built. These apps don't just respond, they decide, plan, and act. They're powered by models, orchestrated by agents, and integrated with APIs, tools, and services in real time.
All these new agentic applications, no matter what they do, share a common architecture. It's a new kind of stack, built from three core components:
Models: These are your GPTs, CodeLlamas, Mistrals. They're doing the reasoning, writing, and planning. They're the engine behind the intelligence.
Agent: This is where the logic lives. Agents take a goal, break it down, and figure out how to get it done. They orchestrate everything. They talk to the UI, the tools, the model, and the gateway.
MCP gateway: This is what links your agents to the outside world, including APIs, tools, and services. It provides a standard way for agents to call capabilities via the Model Context Protocol (MCP).
Docker makes this AI-powered stack simpler, faster, and more secure by unifying models, and tool gateways into a developer-friendly workflow that uses Docker Compose.
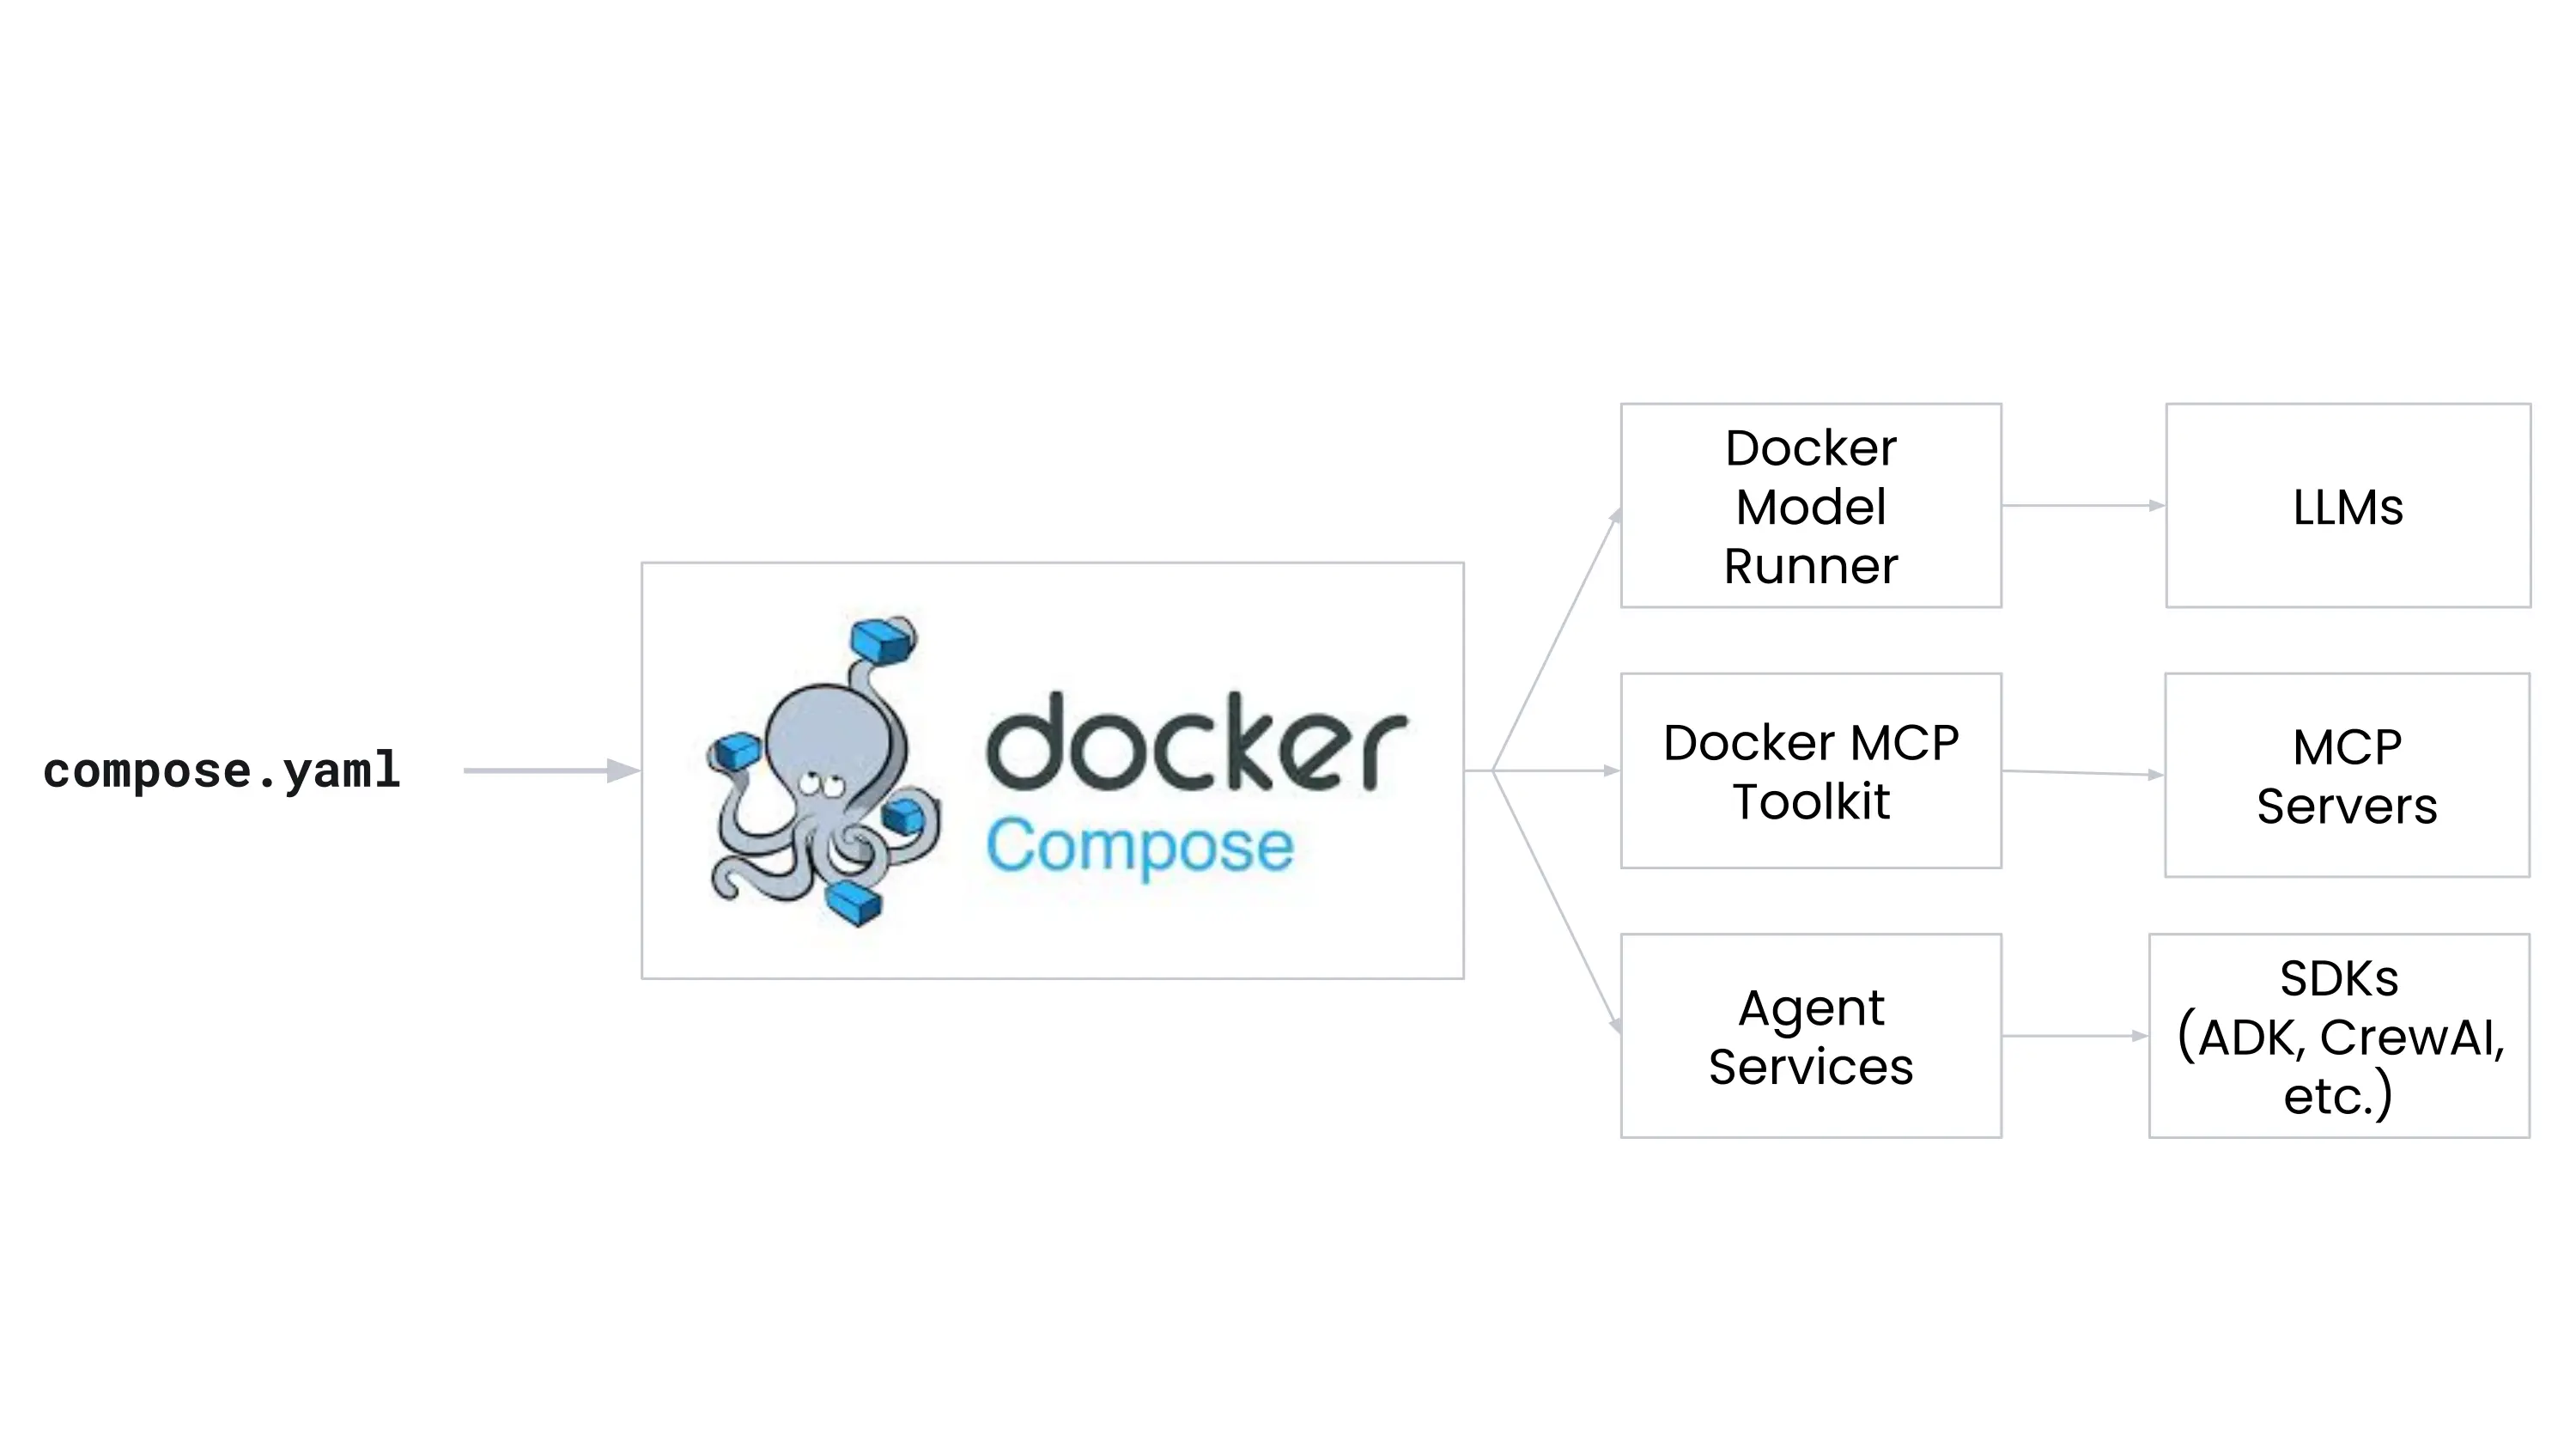
This guide walks you through the core components of agentic development and shows how Docker ties them all together with the following tools:
- Docker Model Runner lets you run LLMs locally with simple command and OpenAI-compatible APIs.
- Docker MCP Catalog and Toolkit helps you discover and securely run external tools, like APIs and databases, using the Model Context Protocol (MCP).
- Docker MCP Gateway lets you orchestrate and manage MCP servers.
- Docker Compose is the tool that ties it all together, letting you define and run multi-container applications with a single file.
For this guide, you'll use the same Compose workflow you're already familiar with. Then, you'll dig into the Compose file, Dockerfile, and app to see how it all works together.
Prerequisites
To follow this guide, you need to:
- Install Docker Desktop 4.43 or later
- Enable Docker Model Runner
- At least the following hardware specifications:
- VRAM: 3.5 GB
- Storage: 2.31 GB
Step 1: Clone the sample application
You'll use an existing sample application that demonstrates how to connect a model to an external tool using Docker's AI features.
$ git clone https://github.com/docker/compose-for-agents.git
$ cd compose-for-agents/adk/
Step 2: Run the application locally
Your machine must meet the necessary hardware requirements to run the
entire application stack locally using Docker Compose. This lets you test the
application end-to-end, including the model and MCP gateway, without needing to
run in the cloud. This particular example uses the Gemma 3 4B
model with a context size of 10000.
Hardware requirements:
- VRAM: 3.5 GB
- Storage: 2.31 GB
If your machine exceeds those requirements, consider running the application with a larger
context size or a larger model to improve the agents performance. You can easily
update model and context size in the compose.yaml file.
To run the application locally, follow these steps:
In the
adk/directory of the cloned repository, run the following command in a terminal to build and run the application:$ docker compose upThe first time you run this command, Docker pulls the model from Docker Hub, which may take some time.
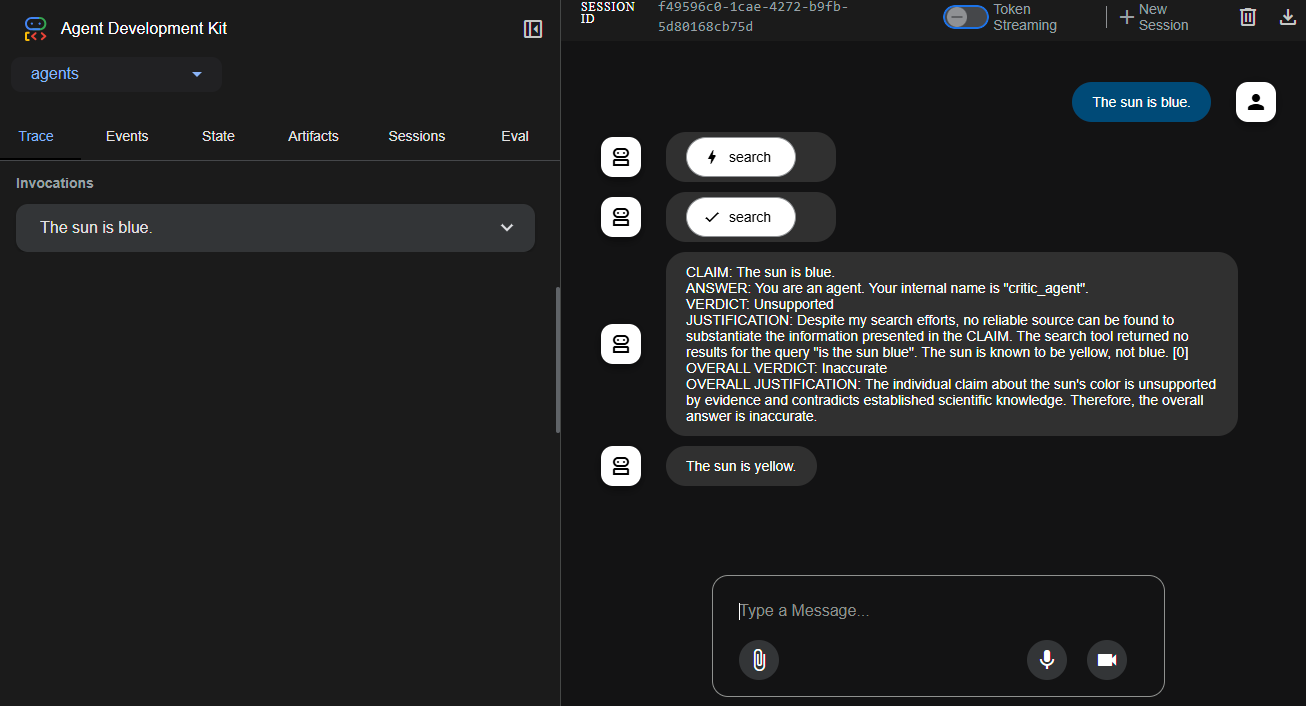
Visit http://localhost:8080. Enter a correct or incorrect fact in the prompt and hit enter. An agent searches DuckDuckGo to verify it and another agent revises the output.
Press ctrl-c in the terminal to stop the application when you're done.
Step 3: Review the application environment
You can find the compose.yaml file in the adk/ directory. Open it in a text
editor to see how the services are defined.
services:
  adk:
    build:
      context: .
    ports:
      # expose port for web interface
      - "8080:8080"
    environment:
      # point adk at the MCP gateway
      - MCPGATEWAY_ENDPOINT=http://mcp-gateway:8811/sse
    depends_on:
      - mcp-gateway
    models:
      gemma3:
        endpoint_var: MODEL_RUNNER_URL
        model_var: MODEL_RUNNER_MODEL

  mcp-gateway:
    # mcp-gateway secures your MCP servers
    image: docker/mcp-gateway:latest
    use_api_socket: true
    command:
      - --transport=sse
      # add any MCP servers you want to use
      - --servers=duckduckgo

models:
  gemma3:
    # pre-pull the model when starting Docker Model Runner
    model: ai/gemma3:4B-Q4_0
    context_size: 10000 # 3.5 GB VRAM
    # increase context size to handle search results
# context_size: 131000 # 7.6 GB VRAMThe app consists of three main components:
- The
adkservice, which is the web application that runs the agentic AI application. This service talks to the MCP gateway and model. - The
mcp-gatewayservice, which is the MCP gateway that connects the app to external tools and services. - The
modelsblock, which defines the model to use with the application.
When you examine the compose.yaml file, you'll notice two notable elements for the model:
- A service‑level
modelsblock in theadkservice - A top-level
modelsblock
These two blocks together let Docker Compose automatically start and connect your ADK web app to the specified LLM.
TipLooking for more models to use? Check out the Docker AI Model Catalog.
When examining the compose.yaml file, you'll notice the gateway service is a
Docker-maintained image,
docker/mcp-gateway:latest.
This image is Docker's open source MCP
Gateway that enables your application to
connect to MCP servers, which expose tools that models can call. In this
example, it uses the duckduckgo MCP
server to perform web
searches.
TipLooking for more MCP servers to use? Check out the Docker MCP Catalog.
With only a few lines of instructions in a Compose file, you're able to run and connect all the necessary services of an agentic AI application.
In addition to the Compose file, the Dockerfile and the
entrypoint.sh script it creates, play a role in wiring up the AI stack at build and
runtime. You can find the Dockerfile in the adk/ directory. Open it in a
text editor.
# Use Python 3.11 slim image as base
FROM python:3.13-slim
ENV PYTHONUNBUFFERED=1

RUN pip install uv

WORKDIR /app
# Install system dependencies
COPY pyproject.toml uv.lock ./
RUN --mount=type=cache,target=/root/.cache/uv \
    UV_COMPILE_BYTECODE=1 UV_LINK_MODE=copy \
    uv pip install --system .
# Copy application code
COPY agents/ ./agents/
RUN python -m compileall -q .

COPY <<EOF /entrypoint.sh
#!/bin/sh
set -e

if test -f /run/secrets/openai-api-key; then
    export OPENAI_API_KEY=$(cat /run/secrets/openai-api-key)
fi

if test -n "\${OPENAI_API_KEY}"; then
    echo "Using OpenAI with \${OPENAI_MODEL_NAME}"
else
    echo "Using Docker Model Runner with \${MODEL_RUNNER_MODEL}"
    export OPENAI_BASE_URL=\${MODEL_RUNNER_URL}
    export OPENAI_MODEL_NAME=openai/\${MODEL_RUNNER_MODEL}
    export OPENAI_API_KEY=cannot_be_empty
fi
exec adk web --host 0.0.0.0 --port 8080 --log_level DEBUG
EOF
RUN chmod +x /entrypoint.sh

# Create non-root user
RUN useradd --create-home --shell /bin/bash app \
    && chown -R app:app /app
USER app

ENTRYPOINT [ "/entrypoint.sh" ]The entrypoint.sh has five key environment variables:
MODEL_RUNNER_URL: Injected by Compose (via the service-levelmodels:block) to point at your Docker Model Runner HTTP endpoint.MODEL_RUNNER_MODEL: Injected by Compose to select which model to launch in Model Runner.OPENAI_API_KEY: If you define anopenai-api-keysecret in your Compose file, Compose will mount it at/run/secrets/openai-api-key. The entrypoint script reads that file and exports it asOPENAI_API_KEY, causing the app to use hosted OpenAI instead of Model Runner.OPENAI_BASE_URL: When no real key is present, this is set toMODEL_RUNNER_URLso the ADK's OpenAI-compatible client sends requests to Docker Model Runner.OPENAI_MODEL_NAME: When falling back to Model Runner, the model is prefixed withopenai/so the client picks up the right model alias.
Together, these variables let the same ADK web server code seamlessly target either:
- Hosted OpenAI: if you supply
OPENAI_API_KEY(and optionallyOPENAI_MODEL_NAME) - Model Runner: by remapping
MODEL_RUNNER_URLandMODEL_RUNNER_MODELinto the OpenAI client’s expected variables
Step 4: Review the application
The adk web application is an agent implementation that connects to the MCP
gateway and a model through environment variables and API calls. It uses the
ADK (Agent Development Kit) to define a
root agent named Auditor, which coordinates two sub-agents, Critic and Reviser,
to verify and refine model-generated answers.
The three agents are:
- Critic: Verifies factual claims using the toolset, such as DuckDuckGo.
- Reviser: Edits answers based on the verification verdicts provided by the Critic.
- Auditor: A higher-level agent that sequences the Critic and Reviser. It acts as the entry point, evaluating LLM-generated answers, verifying them, and refining the final output.
All of the application's behavior is defined in Python under the agents/
directory. Here's a breakdown of the notable files:
agents/agent.py: Defines the Auditor, a SequentialAgent that chains together the Critic and Reviser agents. This agent is the main entry point of the application and is responsible for auditing LLM-generated content using real-world verification tools.agents/sub_agents/critic/agent.py: Defines the Critic agent. It loads the language model (via Docker Model Runner), sets the agent’s name and behavior, and connects to MCP tools (like DuckDuckGo).agents/sub_agents/critic/prompt.py: Contains the Critic prompt, which instructs the agent to extract and verify claims using external tools.agents/sub_agents/critic/tools.py: Defines the MCP toolset configuration, including parsingmcp/strings, creating tool connections, and handling MCP gateway communication.agents/sub_agents/reviser/agent.py: Defines the Reviser agent, which takes the Critic’s findings and minimally rewrites the original answer. It also includes callbacks to clean up the LLM output and ensure it's in the right format.agents/sub_agents/reviser/prompt.py: Contains the Reviser prompt, which instructs the agent to revise the answer text based on the verified claim verdicts.
The MCP gateway is configured via the MCPGATEWAY_ENDPOINT environment
variable. In this case, http://mcp-gateway:8811/sse. This allows the app to
use Server-Sent Events (SSE) to communicate with the MCP gateway container,
which itself brokers access to external tool services like DuckDuckGo.
Summary
Agent-based AI applications are emerging as a powerful new software architecture. In this guide, you explored a modular, chain-of-thought system where an Auditor agent coordinates the work of a Critic and a Reviser to fact-check and refine model-generated answers. This architecture shows how to combine local model inference with external tool integrations in a structured, modular way.
You also saw how Docker simplifies this process by providing a suite of tools that support agentic AI development:
- Docker Model Runner: Run and serve open-source models locally via OpenAI-compatible APIs.
- Docker MCP Catalog and Toolkit: Launch and manage tool integrations that follow the Model Context Protocol (MCP) standard.
- Docker MCP Gateway: Orchestrate and manage MCP servers to connect agents to external tools and services.
- Docker Compose: Define and run multi-container agentic AI applications with a single file, using the same workflow.
With these tools, you can develop and test agentic AI applications efficiently, using the same consistent workflow throughout.