Storage drivers
NoteThis page describes the classic storage drivers, such as
overlay2. Docker Engine 29.0 and later uses the containerd image store by default for fresh installations, which uses snapshotters instead of classic storage drivers. If you're running a fresh installation of Docker Engine 29.0 or later, or if you've migrated to the containerd image store, the concepts on this page still explain how image layers work, but the commands and examples won't reflect how your system stores images. For operational guidance, see containerd image store.
To use storage drivers effectively, it's important to know how Docker builds and stores images, and how these images are used by containers. You can use this information to make informed choices about the best way to persist data from your applications and avoid performance problems along the way.
Storage drivers versus Docker volumes
Docker uses storage drivers to store image layers, and to store data in the writable layer of a container. The container's writable layer doesn't persist after the container is deleted, but is suitable for storing ephemeral data that is generated at runtime. Storage drivers are optimized for space efficiency, but (depending on the storage driver) write speeds are lower than native file system performance, especially for storage drivers that use a copy-on-write filesystem. Write-intensive applications, such as database storage, are impacted by a performance overhead, particularly if pre-existing data exists in the read-only layer.
Use Docker volumes for write-intensive data, data that must persist beyond the container's lifespan, and data that must be shared between containers. Refer to the volumes section to learn how to use volumes to persist data and improve performance.
Images and layers
A Docker image is built up from a series of layers. Each layer represents an instruction in the image's Dockerfile. Each layer except the very last one is read-only. Consider the following Dockerfile:
# syntax=docker/dockerfile:1

FROM ubuntu:22.04
LABEL org.opencontainers.image.authors="org@example.com"
COPY . /app
RUN make /app
RUN rm -r $HOME/.cache
CMD python /app/app.py
This Dockerfile contains four commands. Commands that modify the filesystem create
a new layer. The FROM statement starts out by creating a layer from the ubuntu:22.04
image. The LABEL command only modifies the image's metadata, and doesn't produce
a new layer. The COPY command adds some files from your Docker client's current
directory. The first RUN command builds your application using the make command,
and writes the result to a new layer. The second RUN command removes a cache
directory, and writes the result to a new layer. Finally, the CMD instruction
specifies what command to run within the container, which only modifies the
image's metadata, which doesn't produce an image layer.
Each layer is only a set of differences from the layer before it. Note that both
adding, and removing files will result in a new layer. In the example above,
the $HOME/.cache directory is removed, but will still be available in the
previous layer and add up to the image's total size. Refer to the
Best practices for writing Dockerfiles
and
use multi-stage builds
sections to learn how to optimize your Dockerfiles for efficient images.
The layers are stacked on top of each other. When you create a new container,
you add a new writable layer on top of the underlying layers. This layer is often
called the "container layer". All changes made to the running container, such as
writing new files, modifying existing files, and deleting files, are written to
this thin writable container layer. The diagram below shows a container based
on an ubuntu:15.04 image.
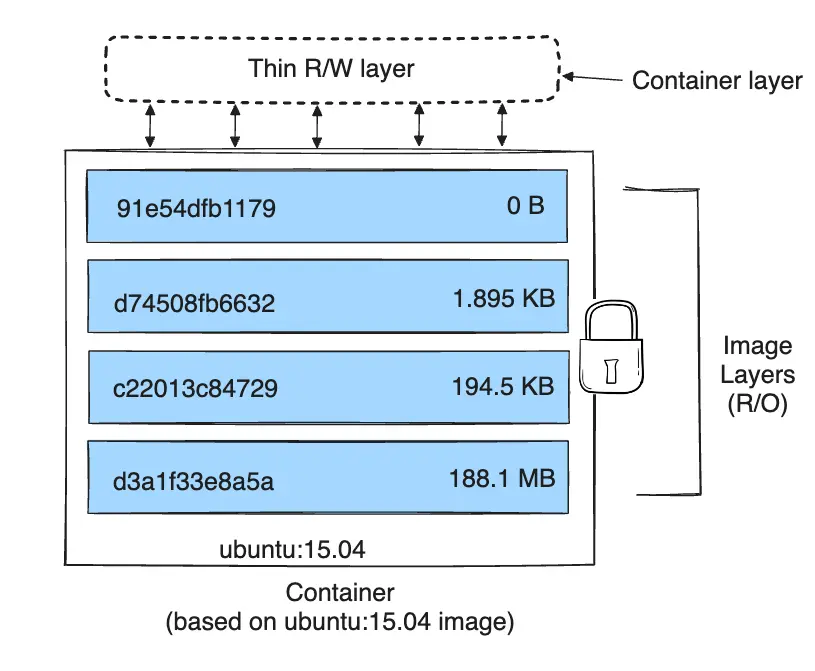
A storage driver handles the details about the way these layers interact with each other. Different storage drivers are available, which have advantages and disadvantages in different situations.
Container and layers
The major difference between a container and an image is the top writable layer. All writes to the container that add new or modify existing data are stored in this writable layer. When the container is deleted, the writable layer is also deleted. The underlying image remains unchanged.
Because each container has its own writable container layer, and all changes are stored in this container layer, multiple containers can share access to the same underlying image and yet have their own data state. The diagram below shows multiple containers sharing the same Ubuntu 15.04 image.
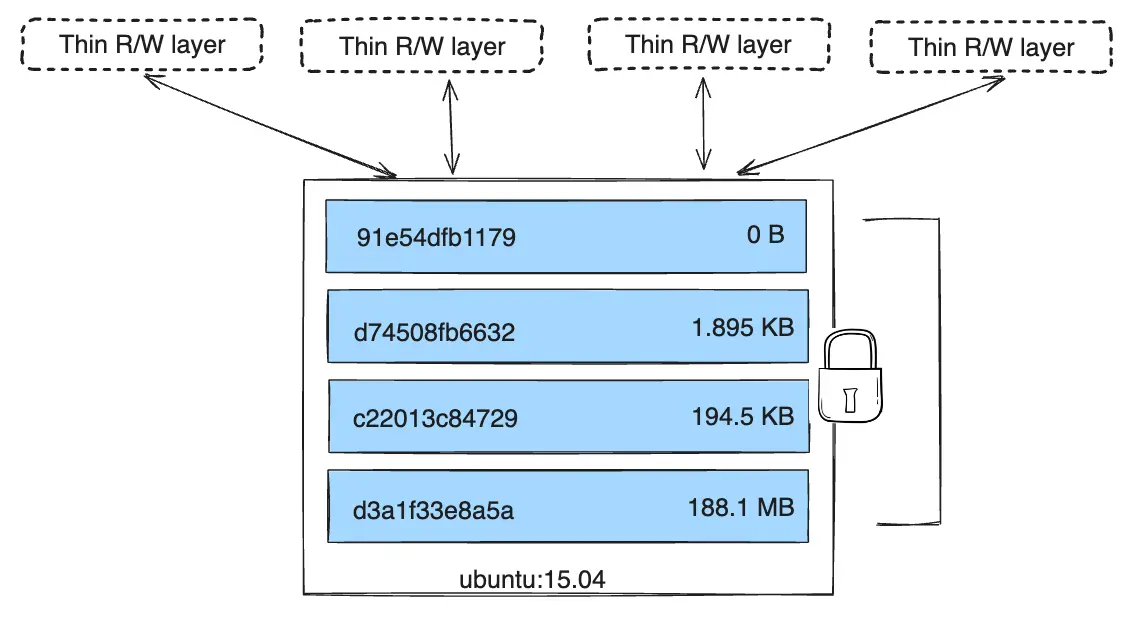
Docker uses storage drivers to manage the contents of the image layers and the writable container layer. Each storage driver handles the implementation differently, but all drivers use stackable image layers and the copy-on-write (CoW) strategy.
NoteUse Docker volumes if you need multiple containers to have shared access to the exact same data. Refer to the volumes section to learn about volumes.
Container size on disk
To view the approximate size of a running container, you can use the docker ps -s
command. Two different columns relate to size.
size: the amount of data (on disk) that's used for the writable layer of each container.virtual size: the amount of data used for the read-only image data used by the container plus the container's writable layersize. Multiple containers may share some or all read-only image data. Two containers started from the same image share 100% of the read-only data, while two containers with different images which have layers in common share those common layers. Therefore, you can't just total the virtual sizes. This over-estimates the total disk usage by a potentially non-trivial amount.
The total disk space used by all of the running containers on disk is some
combination of each container's size and the virtual size values. If
multiple containers started from the same exact image, the total size on disk for
these containers would be SUM (size of containers) plus one image size
(virtual size - size).
This also doesn't count the following additional ways a container can take up disk space:
- Disk space used for log files stored by the logging-driver. This can be non-trivial if your container generates a large amount of logging data and log rotation isn't configured.
- Volumes and bind mounts used by the container.
- Disk space used for the container's configuration files, which are typically small.
- Memory written to disk (if swapping is enabled).
- Checkpoints, if you're using the experimental checkpoint/restore feature.
The copy-on-write (CoW) strategy
Copy-on-write is a strategy of sharing and copying files for maximum efficiency. If a file or directory exists in a lower layer within the image, and another layer (including the writable layer) needs read access to it, it just uses the existing file. The first time another layer needs to modify the file (when building the image or running the container), the file is copied into that layer and modified. This minimizes I/O and the size of each of the subsequent layers. These advantages are explained in more depth below.
Sharing promotes smaller images
When you use docker pull to pull down an image from a repository, or when you
create a container from an image that doesn't yet exist locally, each layer is
pulled down separately, and stored in Docker's local storage area, which is
usually /var/lib/docker/ on Linux hosts. You can see these layers being pulled
in this example:
$ docker pull ubuntu:22.04
22.04: Pulling from library/ubuntu
f476d66f5408: Pull complete
8882c27f669e: Pull complete
d9af21273955: Pull complete
f5029279ec12: Pull complete
Digest: sha256:6120be6a2b7ce665d0cbddc3ce6eae60fe94637c6a66985312d1f02f63cc0bcd
Status: Downloaded newer image for ubuntu:22.04
docker.io/library/ubuntu:22.04
Each of these layers is stored in its own directory inside the Docker host's
local storage area. To examine the layers on the filesystem, list the contents
of /var/lib/docker/<storage-driver>. This example uses the overlay2
storage driver:
$ ls /var/lib/docker/overlay2
16802227a96c24dcbeab5b37821e2b67a9f921749cd9a2e386d5a6d5bc6fc6d3
377d73dbb466e0bc7c9ee23166771b35ebdbe02ef17753d79fd3571d4ce659d7
3f02d96212b03e3383160d31d7c6aeca750d2d8a1879965b89fe8146594c453d
ec1ec45792908e90484f7e629330666e7eee599f08729c93890a7205a6ba35f5
l
The directory names don't correspond to the layer IDs.
Now imagine that you have two different Dockerfiles. You use the first one to
create an image called acme/my-base-image:1.0.
# syntax=docker/dockerfile:1
FROM alpine
RUN apk add --no-cache bash
The second one is based on acme/my-base-image:1.0, but has some additional
layers:
# syntax=docker/dockerfile:1
FROM acme/my-base-image:1.0
COPY . /app
RUN chmod +x /app/hello.sh
CMD /app/hello.sh
The second image contains all the layers from the first image, plus new layers
created by the COPY and RUN instructions, and a read-write container layer.
Docker already has all the layers from the first image, so it doesn't need to
pull them again. The two images share any layers they have in common.
If you build images from the two Dockerfiles, you can use docker image ls and
docker image history commands to verify that the cryptographic IDs of the shared
layers are the same.
Make a new directory
cow-test/and change into it.Within
cow-test/, create a new file calledhello.shwith the following contents.#!/usr/bin/env bash echo "Hello world"Copy the contents of the first Dockerfile above into a new file called
Dockerfile.base.Copy the contents of the second Dockerfile above into a new file called
Dockerfile.Within the
cow-test/directory, build the first image. Don't forget to include the final.in the command. That sets thePATH, which tells Docker where to look for any files that need to be added to the image.$ docker build -t acme/my-base-image:1.0 -f Dockerfile.base . [+] Building 6.0s (11/11) FINISHED => [internal] load build definition from Dockerfile.base 0.4s => => transferring dockerfile: 116B 0.0s => [internal] load .dockerignore 0.3s => => transferring context: 2B 0.0s => resolve image config for docker.io/docker/dockerfile:1 1.5s => [auth] docker/dockerfile:pull token for registry-1.docker.io 0.0s => CACHED docker-image://docker.io/docker/dockerfile:1@sha256:9e2c9eca7367393aecc68795c671... 0.0s => [internal] load .dockerignore 0.0s => [internal] load build definition from Dockerfile.base 0.0s => [internal] load metadata for docker.io/library/alpine:latest 0.0s => CACHED [1/2] FROM docker.io/library/alpine 0.0s => [2/2] RUN apk add --no-cache bash 3.1s => exporting to image 0.2s => => exporting layers 0.2s => => writing image sha256:da3cf8df55ee9777ddcd5afc40fffc3ead816bda99430bad2257de4459625eaa 0.0s => => naming to docker.io/acme/my-base-image:1.0 0.0sBuild the second image.
$ docker build -t acme/my-final-image:1.0 -f Dockerfile .

[+] Building 3.6s (12/12) FINISHED
=> [internal] load build definition from Dockerfile                                            0.1s
=> => transferring dockerfile: 156B                                                            0.0s
=> [internal] load .dockerignore                                                               0.1s
=> => transferring context: 2B                                                                 0.0s
=> resolve image config for docker.io/docker/dockerfile:1                                      0.5s
=> CACHED docker-image://docker.io/docker/dockerfile:1@sha256:9e2c9eca7367393aecc68795c671...  0.0s
=> [internal] load .dockerignore                                                               0.0s
=> [internal] load build definition from Dockerfile                                            0.0s
=> [internal] load metadata for docker.io/acme/my-base-image:1.0                               0.0s
=> [internal] load build context                                                               0.2s
=> => transferring context: 340B                                                               0.0s
=> [1/3] FROM docker.io/acme/my-base-image:1.0                                                 0.2s
=> [2/3] COPY . /app                                                                           0.1s
=> [3/3] RUN chmod +x /app/hello.sh                                                            0.4s
=> exporting to image                                                                          0.1s
=> => exporting layers                                                                         0.1s
=> => writing image sha256:8bd85c42fa7ff6b33902ada7dcefaaae112bf5673873a089d73583b0074313dd    0.0s
=> => naming to docker.io/acme/my-final-image:1.0                                              0.0s
Check out the sizes of the images.
$ docker image ls

REPOSITORY             TAG     IMAGE ID         CREATED               SIZE
acme/my-final-image    1.0     8bd85c42fa7f     About a minute ago    7.75MB
acme/my-base-image     1.0     da3cf8df55ee     2 minutes ago         7.75MB
Check out the history of each image.
$ docker image history acme/my-base-image:1.0

IMAGE          CREATED         CREATED BY                                      SIZE      COMMENT
da3cf8df55ee   5 minutes ago   RUN /bin/sh -c apk add --no-cache bash # bui…   2.15MB    buildkit.dockerfile.v0
<missing>      7 weeks ago     /bin/sh -c #(nop)  CMD ["/bin/sh"]              0B
<missing>      7 weeks ago     /bin/sh -c #(nop) ADD file:f278386b0cef68136…   5.6MB
Some steps don't have a size (
0B), and are metadata-only changes, which do not produce an image layer and don't take up any size, other than the metadata itself. The output above shows that this image consists of 2 image layers.$ docker image history acme/my-final-image:1.0 IMAGE CREATED CREATED BY SIZE COMMENT 8bd85c42fa7f 3 minutes ago CMD ["/bin/sh" "-c" "/app/hello.sh"] 0B buildkit.dockerfile.v0 <missing> 3 minutes ago RUN /bin/sh -c chmod +x /app/hello.sh # buil… 39B buildkit.dockerfile.v0 <missing> 3 minutes ago COPY . /app # buildkit 222B buildkit.dockerfile.v0 <missing> 4 minutes ago RUN /bin/sh -c apk add --no-cache bash # bui… 2.15MB buildkit.dockerfile.v0 <missing> 7 weeks ago /bin/sh -c #(nop) CMD ["/bin/sh"] 0B <missing> 7 weeks ago /bin/sh -c #(nop) ADD file:f278386b0cef68136… 5.6MBNotice that all steps of the first image are also included in the final image. The final image includes the two layers from the first image, and two layers that were added in the second image.
The
<missing>lines in thedocker historyoutput indicate that those steps were either built on another system and part of thealpineimage that was pulled from Docker Hub, or were built with BuildKit as builder. Before BuildKit, the "classic" builder would produce a new "intermediate" image for each step for caching purposes, and theIMAGEcolumn would show the ID of that image.BuildKit uses its own caching mechanism, and no longer requires intermediate images for caching. Refer to BuildKit to learn more about other enhancements made in BuildKit.
Check out the layers for each image
Use the
docker image inspectcommand to view the cryptographic IDs of the layers in each image:$ docker image inspect --format "{{json .RootFS.Layers}}" acme/my-base-image:1.0 [ "sha256:72e830a4dff5f0d5225cdc0a320e85ab1ce06ea5673acfe8d83a7645cbd0e9cf", "sha256:07b4a9068b6af337e8b8f1f1dae3dd14185b2c0003a9a1f0a6fd2587495b204a" ]$ docker image inspect --format "{{json .RootFS.Layers}}" acme/my-final-image:1.0 [ "sha256:72e830a4dff5f0d5225cdc0a320e85ab1ce06ea5673acfe8d83a7645cbd0e9cf", "sha256:07b4a9068b6af337e8b8f1f1dae3dd14185b2c0003a9a1f0a6fd2587495b204a", "sha256:cc644054967e516db4689b5282ee98e4bc4b11ea2255c9630309f559ab96562e", "sha256:e84fb818852626e89a09f5143dbc31fe7f0e0a6a24cd8d2eb68062b904337af4" ]Notice that the first two layers are identical in both images. The second image adds two additional layers. Shared image layers are only stored once in
/var/lib/docker/and are also shared when pushing and pulling an image to an image registry. Shared image layers can therefore reduce network bandwidth and storage.TipFormat output of Docker commands with the
--formatoption.The examples above use the
docker image inspectcommand with the--formatoption to view the layer IDs, formatted as a JSON array. The--formatoption on Docker commands can be a powerful feature that allows you to extract and format specific information from the output, without requiring additional tools such asawkorsed. To learn more about formatting the output of docker commands using the--formatflag, refer to the format command and log output section. We also pretty-printed the JSON output using thejqutility for readability.
Copying makes containers efficient
When you start a container, a thin writable container layer is added on top of the other layers. Any changes the container makes to the filesystem are stored here. Any files the container doesn't change don't get copied to this writable layer. This means that the writable layer is as small as possible.
When an existing file in a container is modified, the storage driver performs a
copy-on-write operation. The specific steps involved depend on the specific
storage driver. For the overlay2 driver, the copy-on-write operation follows
this rough sequence:
- Search through the image layers for the file to update. The process starts at the newest layer and works down to the base layer one layer at a time. When results are found, they're added to a cache to speed future operations.
- Perform a
copy_upoperation on the first copy of the file that's found, to copy the file to the container's writable layer. - Any modifications are made to this copy of the file, and the container can't see the read-only copy of the file that exists in the lower layer.
Btrfs, ZFS, and other drivers handle the copy-on-write differently. You can read more about the methods of these drivers later in their detailed descriptions.
Containers that write a lot of data consume more space than containers
that don't. This is because most write operations consume new space in the
container's thin writable top layer. Note that changing the metadata of files,
for example, changing file permissions or ownership of a file, can also result
in a copy_up operation, therefore duplicating the file to the writable layer.
TipUse volumes for write-heavy applications.
Don't store the data in the container for write-heavy applications. Such applications, for example write-intensive databases, are known to be problematic particularly when pre-existing data exists in the read-only layer.
Instead, use Docker volumes, which are independent of the running container, and designed to be efficient for I/O. In addition, volumes can be shared among containers and don't increase the size of your container's writable layer. Refer to the use volumes section to learn about volumes.
A copy_up operation can incur a noticeable performance overhead. This overhead
is different depending on which storage driver is in use. Large files,
lots of layers, and deep directory trees can make the impact more noticeable.
This is mitigated by the fact that each copy_up operation only occurs the first
time a given file is modified.
To verify the way that copy-on-write works, the following procedure spins up 5
containers based on the acme/my-final-image:1.0 image we built earlier and
examines how much room they take up.
From a terminal on your Docker host, run the following
docker runcommands. The strings at the end are the IDs of each container.$ docker run -dit --name my_container_1 acme/my-final-image:1.0 bash \ && docker run -dit --name my_container_2 acme/my-final-image:1.0 bash \ && docker run -dit --name my_container_3 acme/my-final-image:1.0 bash \ && docker run -dit --name my_container_4 acme/my-final-image:1.0 bash \ && docker run -dit --name my_container_5 acme/my-final-image:1.0 bash 40ebdd7634162eb42bdb1ba76a395095527e9c0aa40348e6c325bd0aa289423c a5ff32e2b551168b9498870faf16c9cd0af820edf8a5c157f7b80da59d01a107 3ed3c1a10430e09f253704116965b01ca920202d52f3bf381fbb833b8ae356bc 939b3bf9e7ece24bcffec57d974c939da2bdcc6a5077b5459c897c1e2fa37a39 cddae31c314fbab3f7eabeb9b26733838187abc9a2ed53f97bd5b04cd7984a5aRun the
docker pscommand with the--sizeoption to verify the 5 containers are running, and to see each container's size.$ docker ps --size --format "table {{.ID}}\t{{.Image}}\t{{.Names}}\t{{.Size}}" CONTAINER ID IMAGE NAMES SIZE cddae31c314f acme/my-final-image:1.0 my_container_5 0B (virtual 7.75MB) 939b3bf9e7ec acme/my-final-image:1.0 my_container_4 0B (virtual 7.75MB) 3ed3c1a10430 acme/my-final-image:1.0 my_container_3 0B (virtual 7.75MB) a5ff32e2b551 acme/my-final-image:1.0 my_container_2 0B (virtual 7.75MB) 40ebdd763416 acme/my-final-image:1.0 my_container_1 0B (virtual 7.75MB)The output above shows that all containers share the image's read-only layers (7.75MB), but no data was written to the container's filesystem, so no additional storage is used for the containers.
NoteThis step requires a Linux machine, and doesn't work on Docker Desktop, as it requires access to the Docker Daemon's file storage.
While the output of
docker psprovides you information about disk space consumed by a container's writable layer, it doesn't include information about metadata and log-files stored for each container.More details can be obtained by exploring the Docker Daemon's storage location (
/var/lib/dockerby default).$ sudo du -sh /var/lib/docker/containers/* 36K /var/lib/docker/containers/3ed3c1a10430e09f253704116965b01ca920202d52f3bf381fbb833b8ae356bc 36K /var/lib/docker/containers/40ebdd7634162eb42bdb1ba76a395095527e9c0aa40348e6c325bd0aa289423c 36K /var/lib/docker/containers/939b3bf9e7ece24bcffec57d974c939da2bdcc6a5077b5459c897c1e2fa37a39 36K /var/lib/docker/containers/a5ff32e2b551168b9498870faf16c9cd0af820edf8a5c157f7b80da59d01a107 36K /var/lib/docker/containers/cddae31c314fbab3f7eabeb9b26733838187abc9a2ed53f97bd5b04cd7984a5aEach of these containers only takes up 36k of space on the filesystem.
Per-container storage
To demonstrate this, run the following command to write the word 'hello' to a file on the container's writable layer in containers
my_container_1,my_container_2, andmy_container_3:$ for i in {1..3}; do docker exec my_container_$i sh -c 'printf hello > /out.txt'; doneRunning the
docker pscommand again afterward shows that those containers now consume 5 bytes each. This data is unique to each container, and not shared. The read-only layers of the containers aren't affected, and are still shared by all containers.$ docker ps --size --format "table {{.ID}}\t{{.Image}}\t{{.Names}}\t{{.Size}}" CONTAINER ID IMAGE NAMES SIZE cddae31c314f acme/my-final-image:1.0 my_container_5 0B (virtual 7.75MB) 939b3bf9e7ec acme/my-final-image:1.0 my_container_4 0B (virtual 7.75MB) 3ed3c1a10430 acme/my-final-image:1.0 my_container_3 5B (virtual 7.75MB) a5ff32e2b551 acme/my-final-image:1.0 my_container_2 5B (virtual 7.75MB) 40ebdd763416 acme/my-final-image:1.0 my_container_1 5B (virtual 7.75MB)
The previous examples illustrate how copy-on-write filesystems help make containers efficient. Not only does copy-on-write save space, but it also reduces container start-up time. When you create a container (or multiple containers from the same image), Docker only needs to create the thin writable container layer.
If Docker had to make an entire copy of the underlying image stack each time it
created a new container, container creation times and disk space used would be
significantly increased. This would be similar to the way that virtual machines
work, with one or more virtual disks per virtual machine. The vfs storage
doesn't provide a CoW filesystem or other optimizations. When using this storage
driver, a full copy of the image's data is created for each container.